
- The Good, the Bad, and the Ugly. Sometimes even the Ugly can be a triumph, but however it turns out here are the Reports to Headquarters on the results of battles. Interesting, embarrassing, or instructive, you may find something entertaining or engaging.
Foreword:
Done recently while preparing this Web Site. I thought well, why not? It has been an age since I first tried it and got my arse kicked to put not too fine a point on it. A very sobering experience! But I was completely hooked and by and by I got to grips with my shocking tactical inadequacies.
To my horror, in this battle, I lost a Panther in the first 10 seconds! The force of Deja Vu hit me like a 17pdr AT Gun penetrating the side armour of the PzKw V brewing it up catastrophically, but it turned out to be a PIAT or Bazooka probably That's more or less what happened the very first time I played the Trial in 1997! But I am made of sterner stuff now, even though it is something like two decades since I played these games seriously.
So here is a review of CCII from the Game Command screen, through 5 battle screens with 3 screens with Debriefing and Unit Details so you get a very quick view of what CCII is, but remember, it is only a single battle. And despite the early loss, I gave them one hell of a beating!
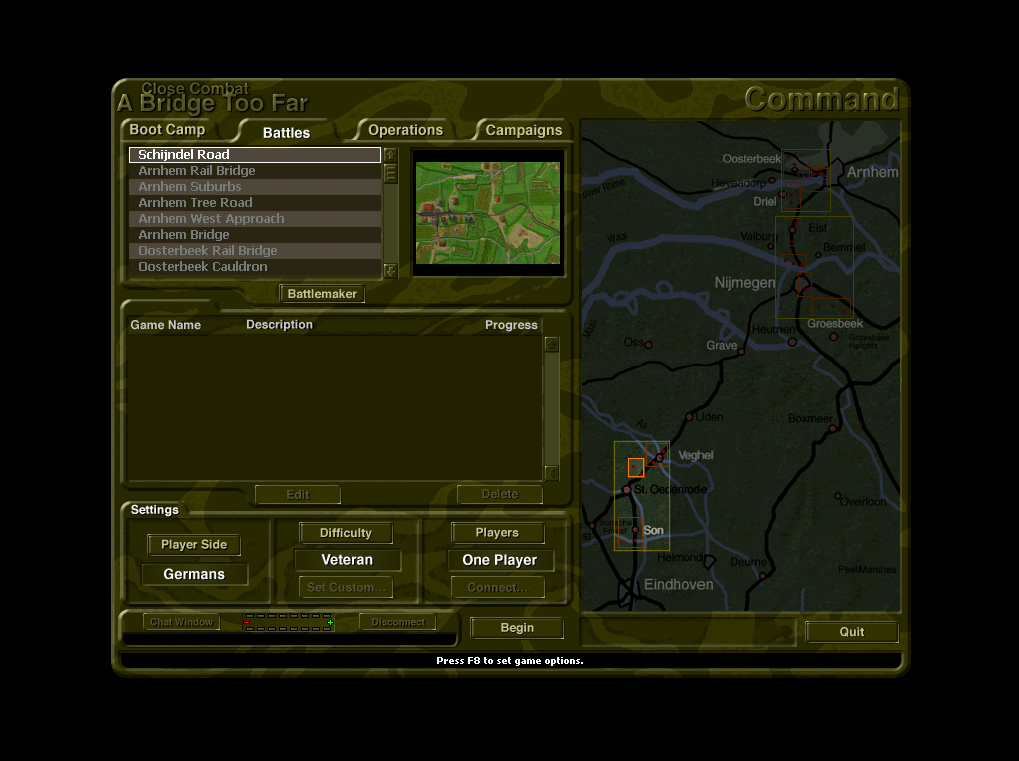
The main A Bridge too Far Command Screen
In the Trial you only get to fight one battle, though you can do the Boot Camps which I highly recommend! Don't go into battle unless you know how to direct your Units. The game is Real Time and your enemy is not going to wait around while you work out how to get out of the way or fire at him!
Choose your side - I chose Germans - then click Begin.
You will be shown the battle Map where you can deploy your Units ready for the battle.
In the next screen there is a snapshot of the Deployment screen
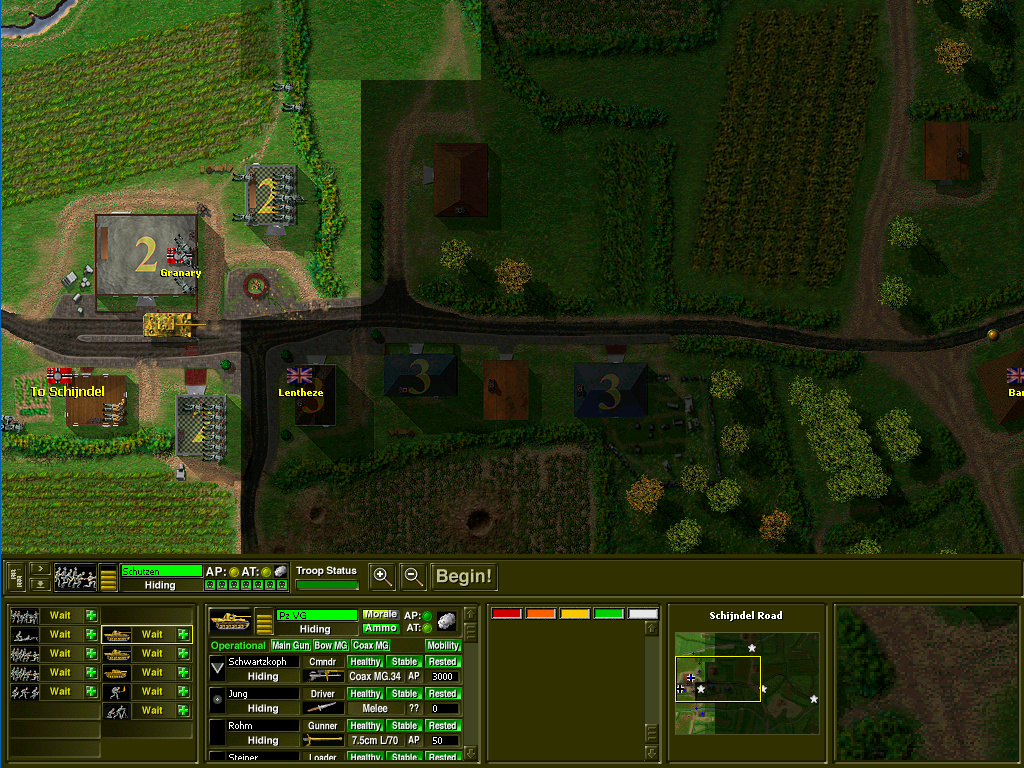
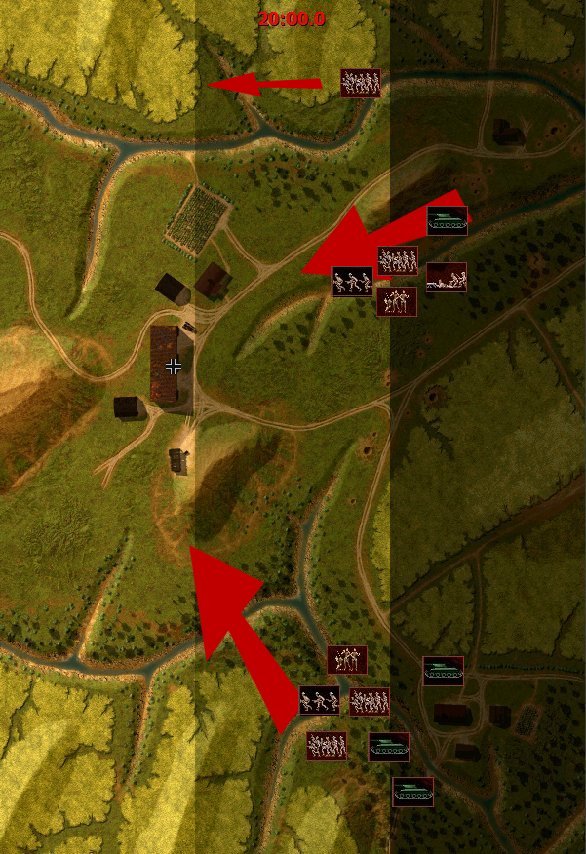
The main battle view.
During the Deployment Phase, you are able to move your Units wherever you are able in the bright area. The dark area is where there may be enemy Units, and the mid-tone area is No Mans Land where you cannot deploy and there are no Enemy Units.
You will be able to deduce obstacles, cover, lines of sight and other important dynamics. Note where Victory Locations are situated as these are important in determining the outcomes of battles, and the enemy will be after them!
Note the Mini Map, the Teams Roster, and other useful Metrics about your Units.
As it turned out, positioning my Panther there was not the brightest decision! I had wanted to cover anything coming down the road banking on the good frontal armour and the excellent 75mm to prevail against whatever came, but the enemy had other ideas! Harumph!
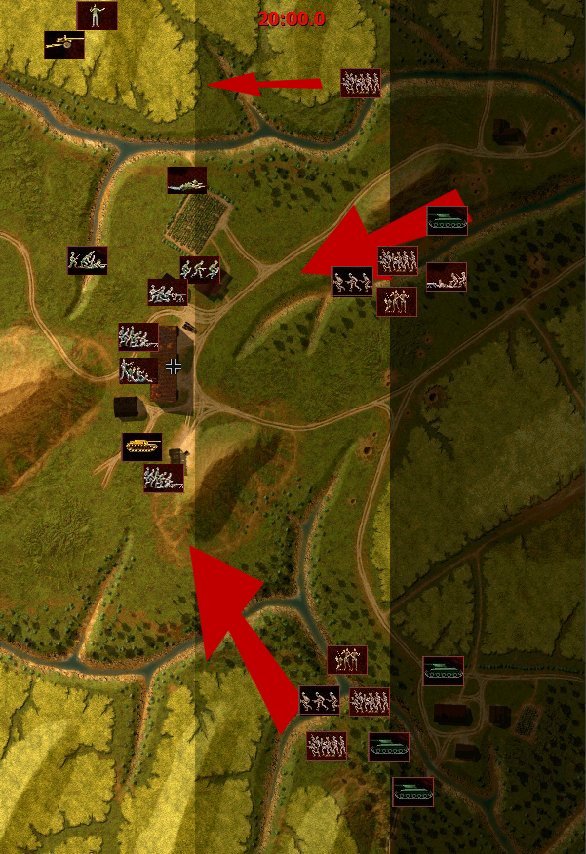
Battle begins!
Note in the bottom Panel in the centre there is a running status of the action. The 17pdr AT Gun which I hadn't factored during deployment could have been a nasty surprise but I had positioned an StuH 42 on my right flank which spotted it before it could respond and destroyed it. Was my Panther safe? Wait for the next Clip.
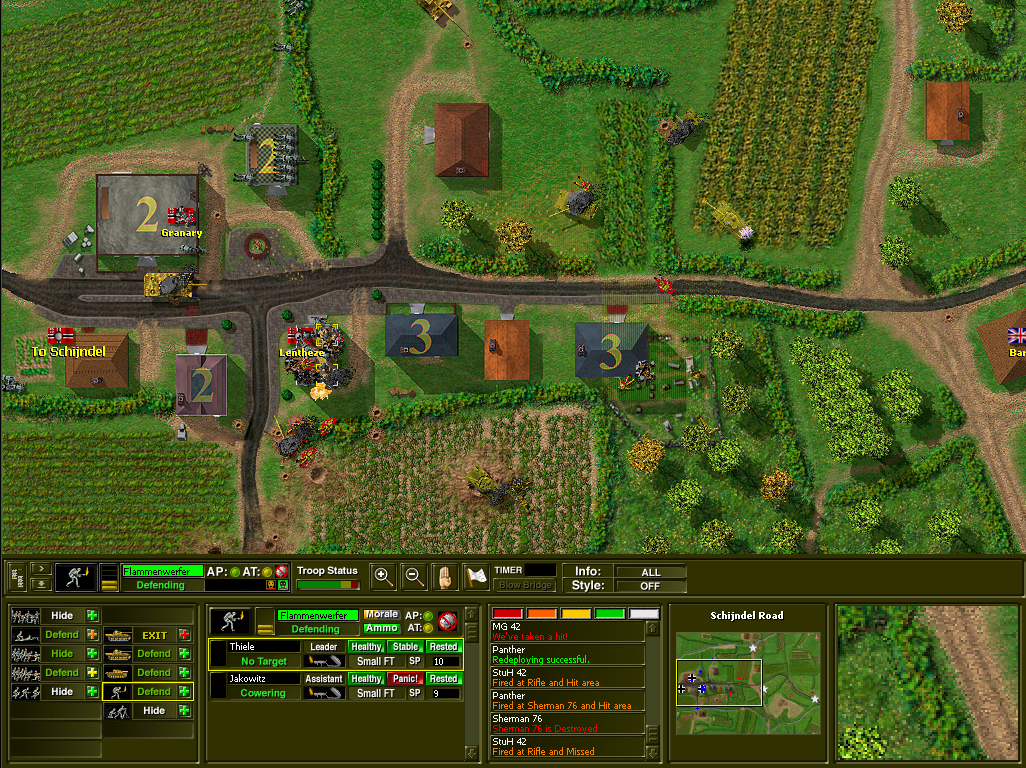
I had positioned an MG42 Team in the Granary and a Flammenwerfer Team in the leftmost building. With houses to clear they are awesome, but have a tendency to blow up if they take hits so was keeping them back initially and let the Infantry and armour do the initial engagements.
Other than that, at this stage it looks good.
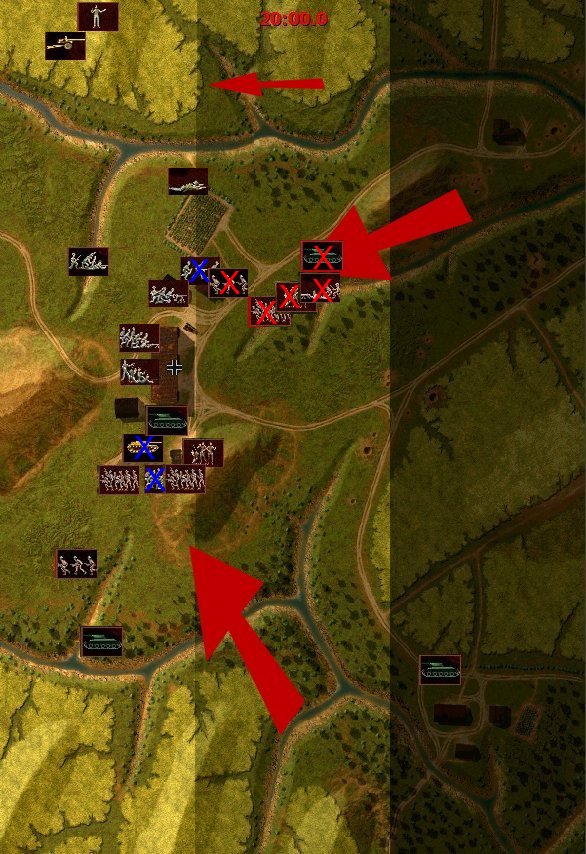
And then...
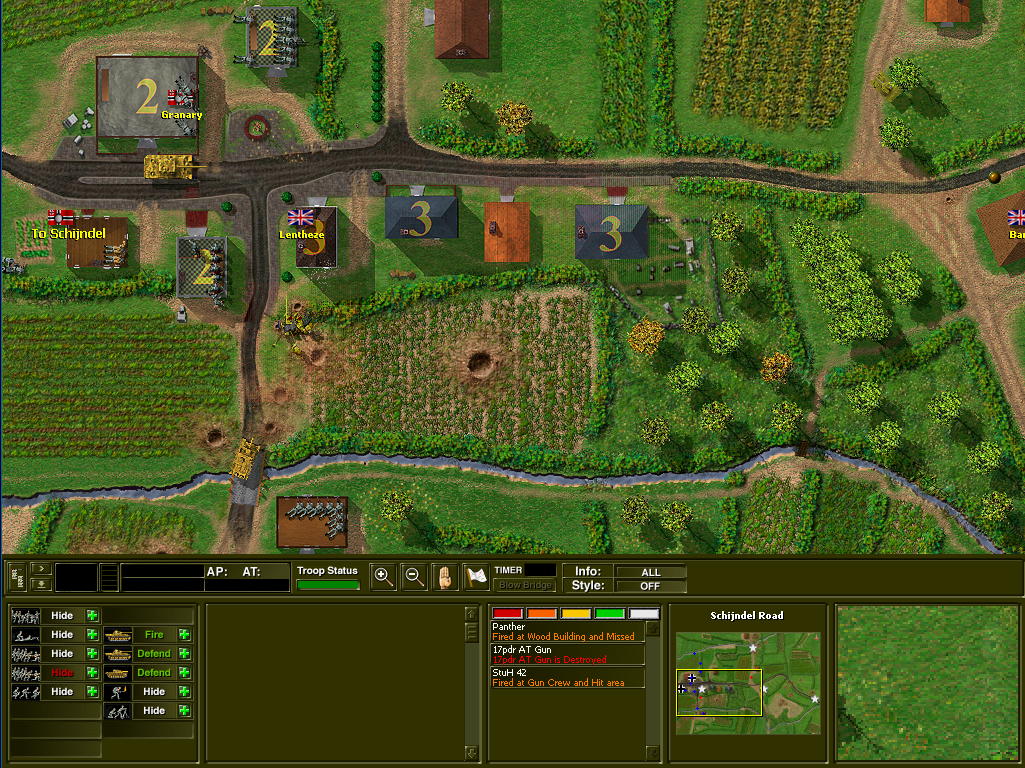
AT team attack!
PIAT or Bazooka I don't know, but Boom! Strike one Panther. Note to self: Should have held it further back, Ahem! Some of the Crew survived.
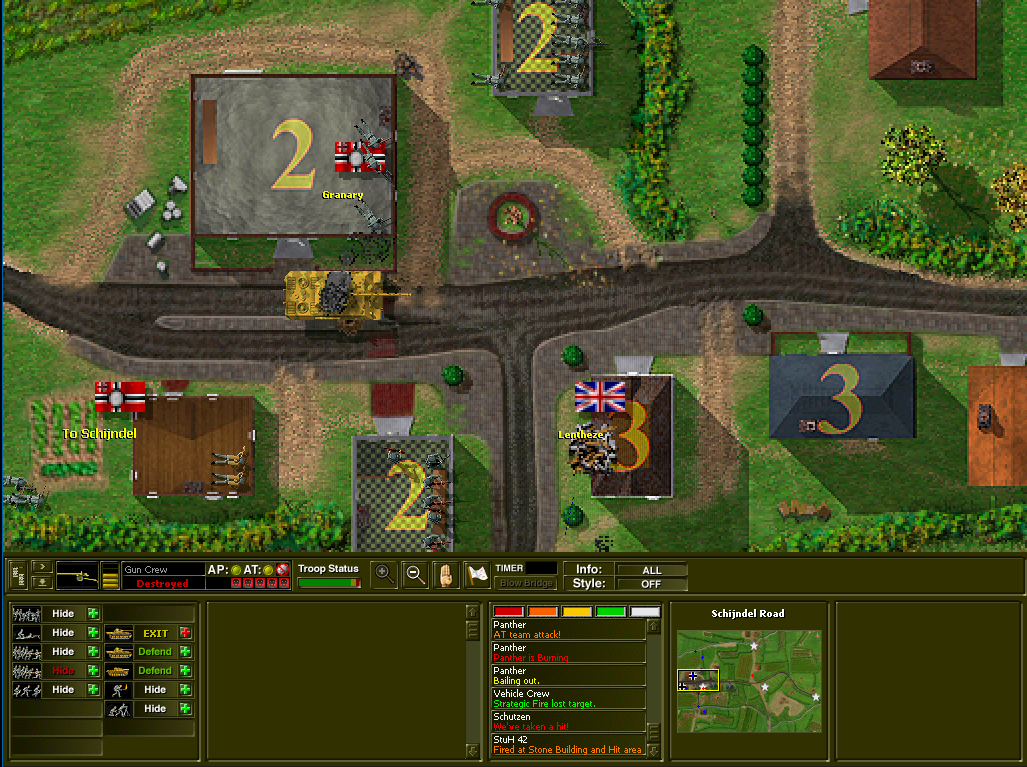
Meanwhile things were hotting up as there were enemy Units in the building with the Victory Location (VL) - should have been obvious - exchanging fire with my Teams, but they are going to have a hard time with HE coming in from the StuH 42.
I also had a Panther to the north on my left flank so I still had options and I hadn't seen any enemy armour approaching yet, but I didn't know what they had either.
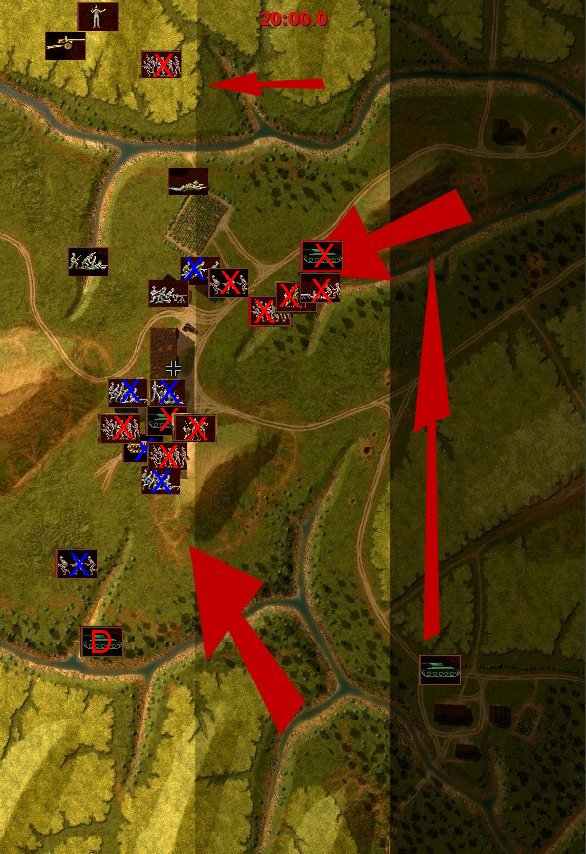
Fast Forward...
Heating up!
Did I say where is the enemy armour? In the space of a few minutes a Sherman clattered down my left flank and was taken out by the StuH 42 from the side. A Stuart made the mistake of presenting itself to the Panther on my right flank and was destroyed along with a Sherman 76 which could have caused me a problem. The a Firefly appeared, and that definitely could cause me a problem as it can go toe to toe with a Panther with ease.
So I chose to let it come to me and hoped I would get in the first shot(s) which is not a bad numbers game (it works more often than not), and crossed fingers.
Meanwhile my Schutzen and Flammenwerfers had cleared out the VL House and were preparing to take the assault to the next house. For that I was going to bring up the StuH 42 in support, as you will see in the next screen.
Again notice the battle action being displayed in the bottom Panel.
The gamble paid off!
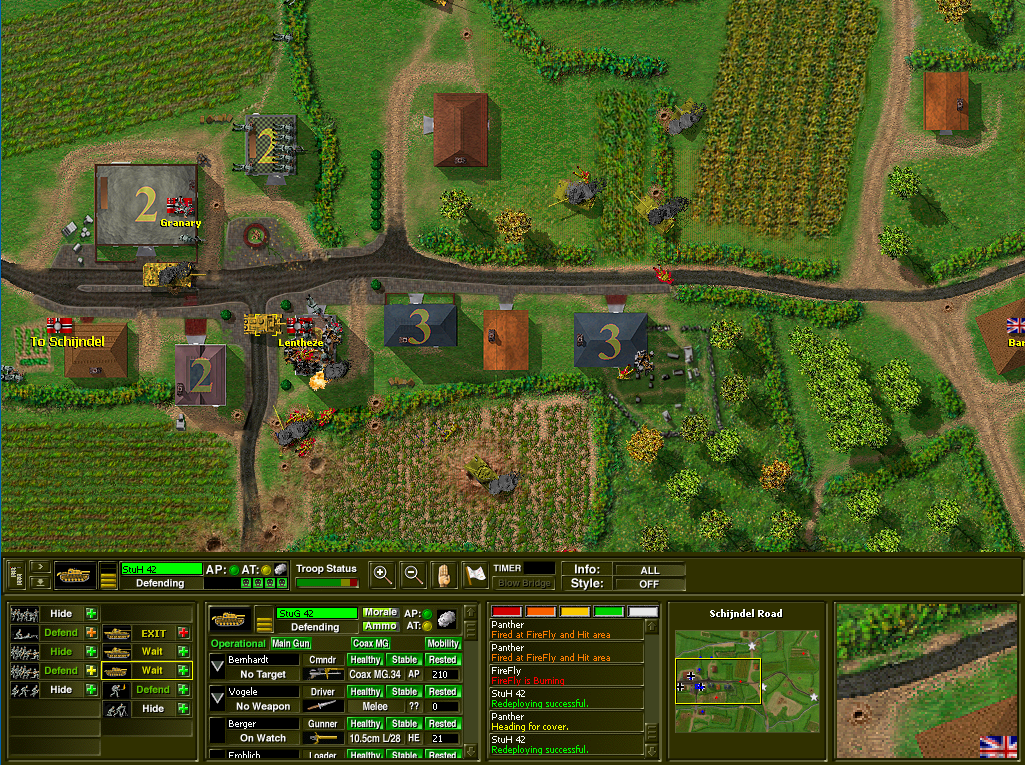
The Firefly advanced toward my Panther, took two hits, and was destroyed. Phew! It looked like the enemy's armour was in complete disarray, and I had superiority. A great advantage if not wasted.
I moved up the StuH 42 in support of the house clearing assaults, and started moving my Units forward to capture all the VL's. The surviving Panther Crew had fled the battle by this time.
I did not take anymore screenshots as the action became quite tame after that. The enemy had lost all their armour and most of their Infantry, so I was able to work my way along with very minimal casualties as they retreated in disarray, and I eventually took all the VL's.
Debriefing
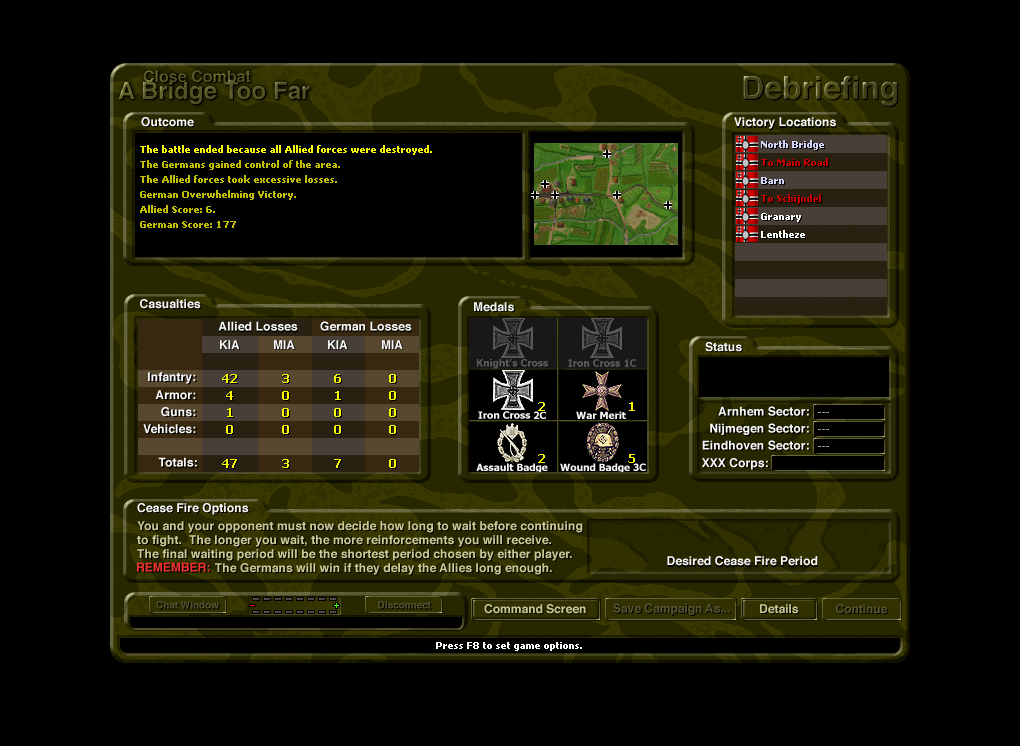
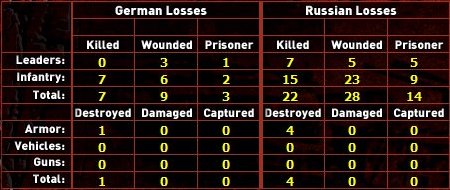
After the battle, CCII will give you a summary of the result.
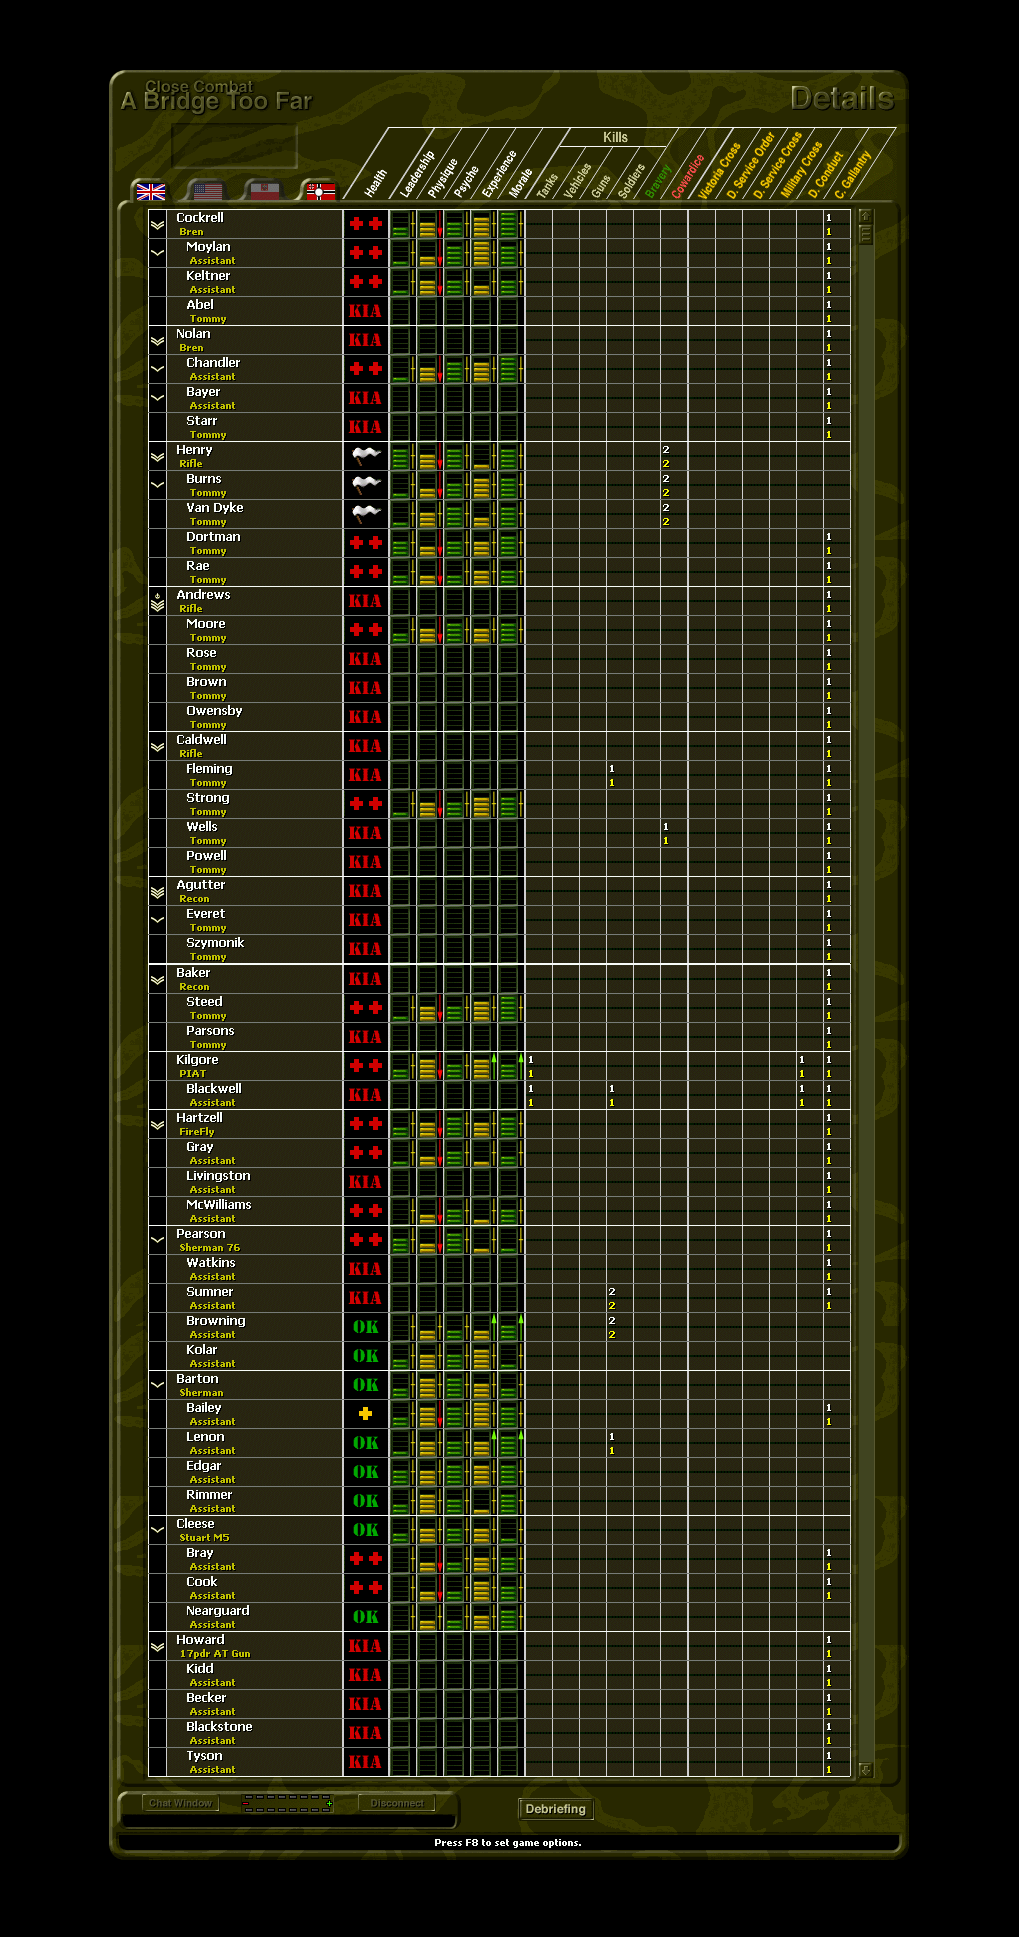
As you can see, even after the initial disaster of losing the Panther, keeping a steady head and focused tactics (even if crossing my fingers on occasion), it turned out extremely well. The enemy took an absolute battering! 42 Infantry KIA against my 6, and 2 Iron Crosses earned in the process.
In the next 2 screens, I will show the Unit details where you can see the results of each individual soldier by name and type. While this was just for one battle, these statistic are kept during whole Operations and Campaigns, and become a particular feature of CCIII as that tracks a single Battle Group through entire Operations and Campaigns, while CCII is comprised of different Battle Groups in different Sectors.
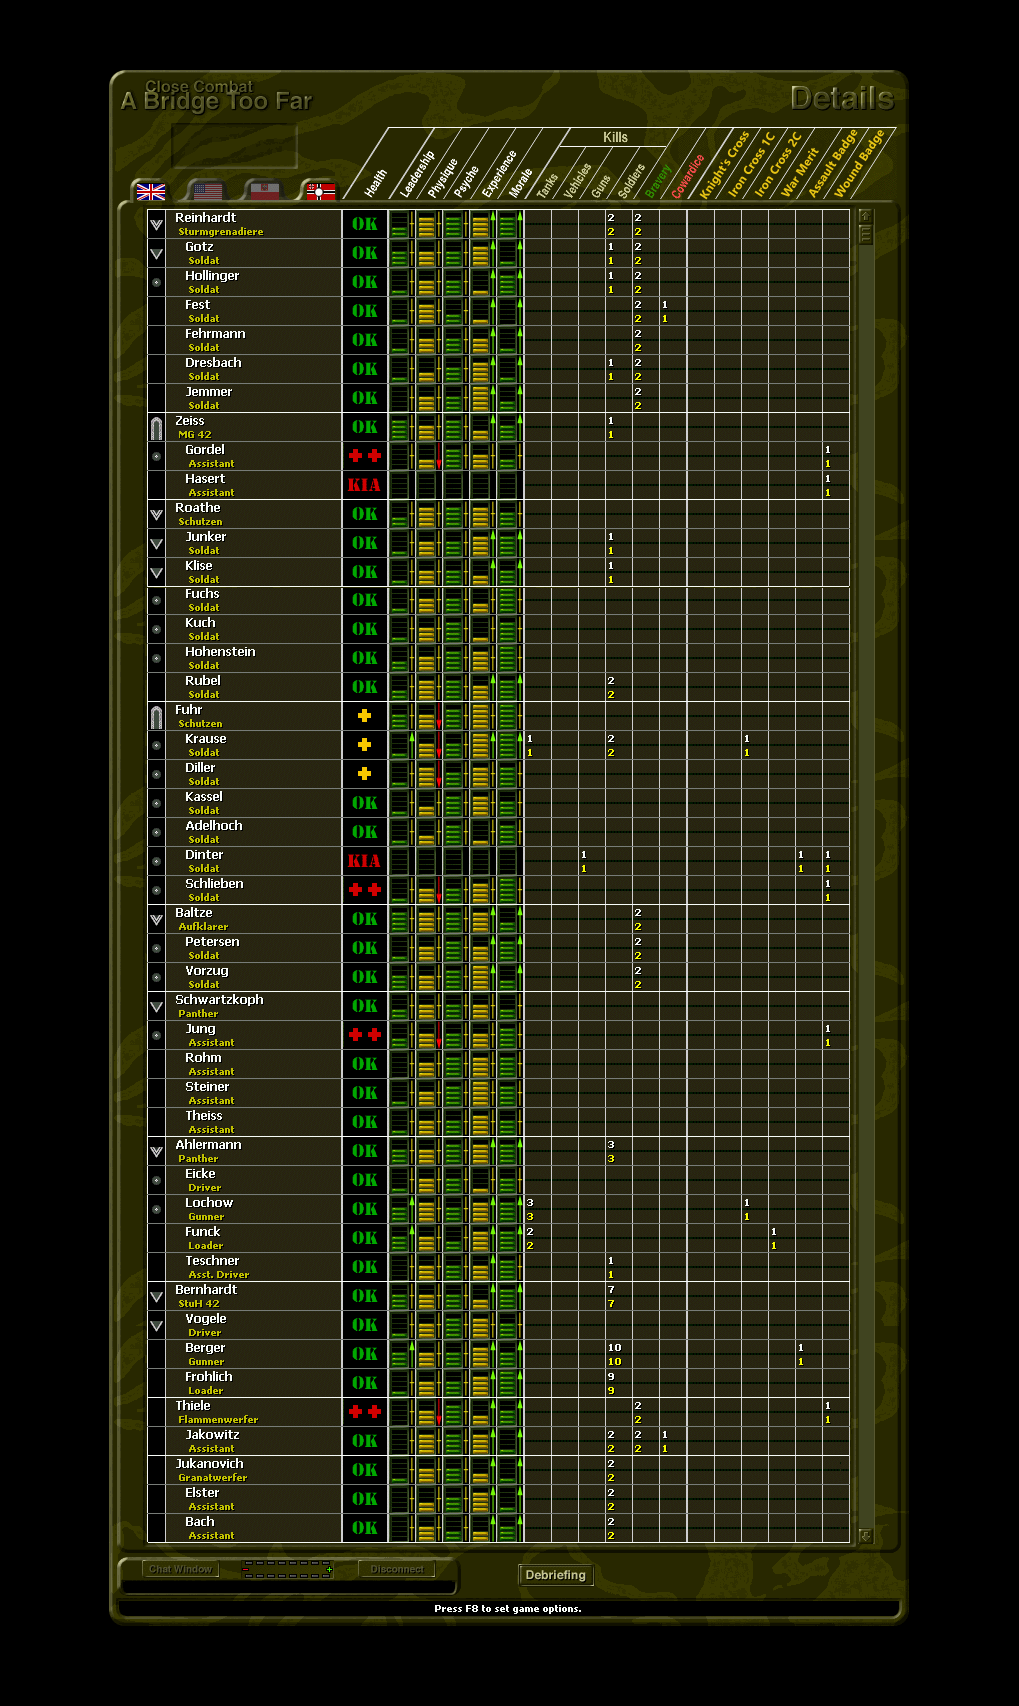
Details: Germans
Details: Allies
In conclusion
And that completes a complete review of a single battle with the CCII Game Trial.
As previously mentioned, the very first time I played it I was beaten soundly because I did not appreciate the battle dynamics, so the AI punished my mistakes. Fortunately this is just Pixels on a Screen and not the real world, but the software is such a good simulation that it plays very accurately as a simulation, which is why, further down the line, the US Marine Corps and the RAF Regiment decided to use it as a Squad Level Tactical Decision Making Simulator for their Personnel.
And you can pause the action if you want at any time (but you cannot save and pick up again), but I advise you not to (unless nature calls). In real life the enemy doesn't offer such niceties. Once the action starts the clock is ticking and it isn't over until it is over. Give it a try.
Foreword:
I don't remember the details now, but I think this was a custom battle in Cross of Iron. The single VL is the clue. I wouldn't pay much mind to it but a couple of things stood out.
First, I had edited specific Team details and made graphic indicators on the Maps for some reason at the time. And second is the battle Health and Kills Briefs where I was seriously wounded and yet managed to destroy a T34! So here are 6 Map screenshots and some Team Rosters and Health and Kills Briefs from that action. It is really so long ago I cannot remember more details.
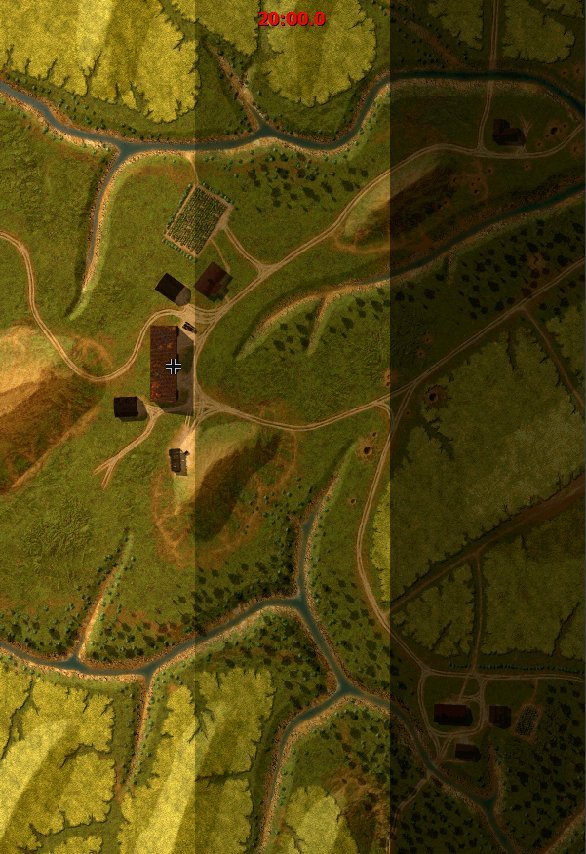
The battle Map
Russians attacking from the East. A single VL will make them focus on that, so my task was obviously to repel the attack and defend the VL or lose the battle.
I had clear lines of fire in various directions from the north and east, though the south looked awkward. Using the small hill as cover from that approach would be vulnerable to units from the north or even closer at the centre.
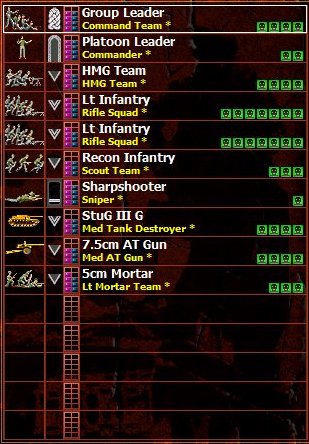
The Battle Group
To defend this, there was a core of Infantry with a Stug III G and a PaK 40, and a 5cm Garanatwerfer in support. 10 Units in total
The enemy was expected to be stronger as we will see in the next image.

The enemy.
While relative parity in Command personnel (6 to 6), infantry outnumbered 50 to 22, and armour 4 to 1, although my Pak 40 adjusts the balance.
Never-the-less, a superior enemy force.
My forecast
This is how I expected the attack to come.
Focused on the VL, one prong from the centre/north, and one from the south.
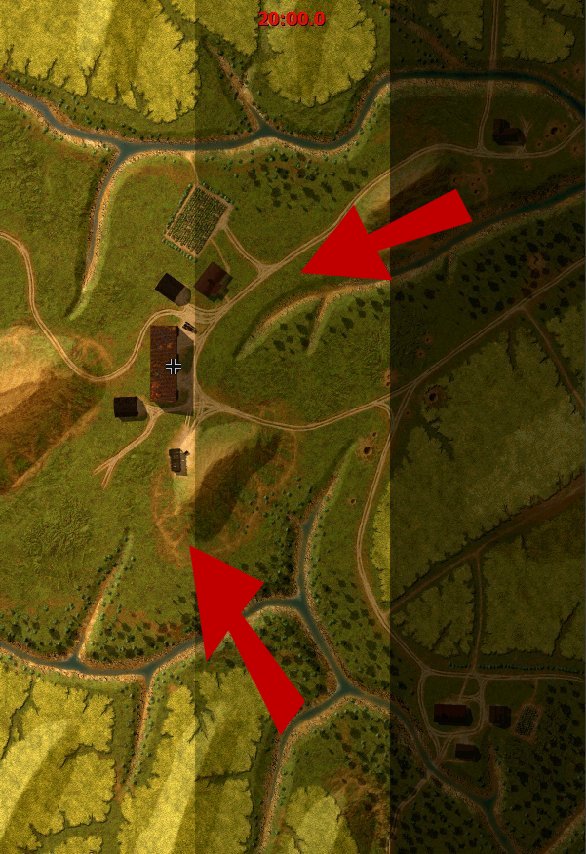
Here they come
Here you can see the enemy Units as they attack.
The strongest assault came from the south which I don't think I had anticipated, as you will see in the next screenshot where my deployment is revealed. That turned out to be a problem!
Deployment
I only had 2 Tank killers, the PaK 40 and the StuG III, and 4 T34's to deal with.
The PaK 40 is very vulnerable once spotted, and the StuG III though a capable hitter, will get overwhelmed when facing several T34's all intent on killing it. It can't take them all on at once!
I had to make a strong defence at the VL, so positioned the strongest body of infantry and the StuG III there, and set up the PaK 40 to the north with a sweeping field of fire across the centre. It has enough punch to take on anything on the Map at these distances. I also positioned a Commander there to improve morale and performance. This is important!
The small hill was to give some cover initially as the enemy T34's rumbled their way towards my positions, but this did mean that when they came into contact, it would be very close range on multiple targets. Tricky.
Combat
In the north. the PaK 40 was very effective, killing the T34 in the centre, and without the armour support, the infantry suffered badly from the HMG in the building.
But it did not go so well from the south.
A T34 broke through and the Stug III was destroyed. This left the infantry around the VL without heavy weapons support unless the PaK 40 could get a bead on any of the armour.
Survival
This was the last Map screenshot in the Archive, so I am not sure exactly how the battle went in detail.
It looks like the T34 that broke through came too close to the house and that is where I (vonB) manage to score the kill, and get seriously wounded in the process.
However what isn't clear from these Maps but is shown in the Battle Briefs, is the StuG II scored a T34 kill before being destroyed, and I would guess that is the one shown to the south (with the red letter 'D').
Meanwhile, both my infantry and the enemy infantry are taking casualties, and the remaining T34 makes a run north where it must have been taken out by the PaK 40 as the Battle Brief shows the PaK 40 took out two T34's.
The Archive offers no more information, but I would guess that the enemy force would collapse at that point and flee the Map.
The Aftermath
Not as bad as it first appeared, losing the StuG III and 7 infantry killed with 3 prisoners taken (see the Health Roster for Surrenders). A total of 19 killed, wounded, and prisoners.
The enemy losses were huge. A total of 64 killed, wounded, and prisoners with all 4 tanks destroyed.
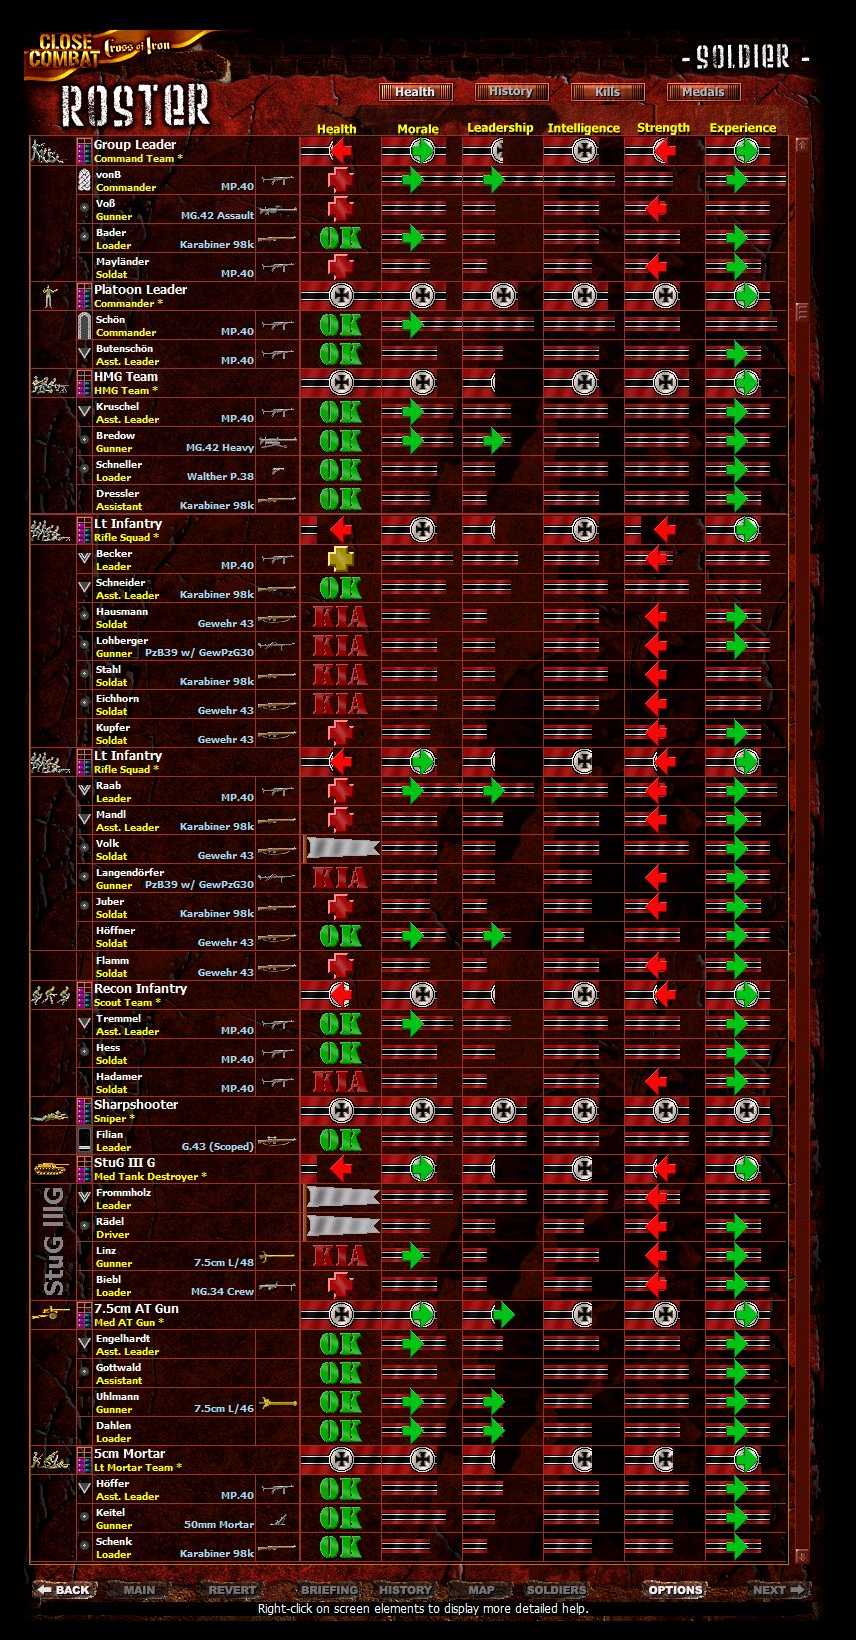
Health Roster
You will have seen the first part on the Home Page which shows the Command vonB with serious wounds. This is the full Roster, and you will see that 3 surrendered including 2 of the StuG III Crew including the Leader.
The two Light Infantry Squads took a battering and only 2 came out unscathed and one with moderate wounds. The rest are either dead or seriously wounded, so they took the brunt!
My Command Team also were hit badly, but they were also in the thick of the fray.
The rest survived in relatively good condition.

Kill Roster
This is where it shows the Commander (vonB) has killed a T34! I wouldn't have thought it possible unless I saw it in the stats.
It's also where the StuG III is shown to have killed a T34 as that wasn't clear from the Map sequences.
The HMG Team shows just how devastating it can be, and also how well the Platoon Leader assigned to the PaK 40 performed. It was a good job he was there as an enemy Squad of 10 soldiers moved on the AT Gun and might have destroyed it if he wasn't, and he was awarded 4 Bravery Marks!
But 10 acts of Cowardice as well from the Stug III and one of the Squads of Infantry.
In Conclusion
That's all the media there was in this Archive, and no explanatory text accompanying, just what we could infer. But the Commander with an MP40 killing a T34 and surviving is a bit special.
A pity I didn't take the Medals screenshot as I am sure there must have been some awarded!